Cloud 2.0 - Creating Categories for Retail 2.0
🛠️ Steps to Create a Category
1. Log in to the Cloud Portal
Use your credentials to access the Hippos Cloud Portal.
2. Navigate to Categories
- Click on Items & Categories from the main menu.
- Then select Categories.
3. Add a New Category
- Click the ADD NEW CATEGORY button.
- A pop-up window will appear with the category creation form.
🧾 Category Creation Form Overview
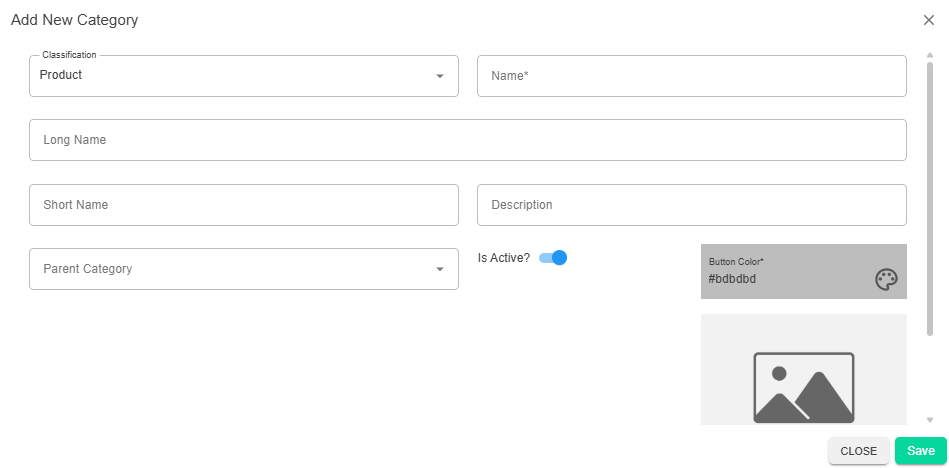
Classification
Choose the type of category from the dropdown:
- Product – Standard product grouping
- Material – For raw materials or components
- Option – Used for optional add-ons or modifiers
- Variant – For variations like size or color
Name
The required name of the category. This will be displayed in the POS and item setup screens.
Long Name
An extended version of the category name, useful for internal clarity or external display.
Short Name
A brief label for the category, often used in compact views or reports.
Parent Category
Select a parent category if this is a subcategory. This helps build a hierarchical structure.
Description
Optional field to describe the purpose or contents of the category.
Is Active?
Toggle ON/OFF to control whether the category is currently available for use.
Button Color
Choose a color for the category button in the POS interface. This helps visually distinguish categories.
Upload Image
Upload an image to visually represent the category in the POS or online menus.